3D view visualization tools
The 3D view includes a visualization toolbar in the upper-right corner with tools that help you analyze the acoustic behavior of your model. These tools are available in both the editor and the results view.
The toolbar contains three visualization modes, each represented by an icon button. The modes are mutually exclusive: activating one deactivates any previously active mode.

Particle animation
Particle animation lets you visualize how sound propagates through the model in real time. When activated, particles are emitted from a selected source and travel through the geometry, reflecting off surfaces as they go. This makes it easy to quickly understand how sound energy spreads and where reflections occur.
To activate particle animation, click the particle animation icon in the toolbar.
Playback controls
Once activated, the toolbar displays playback controls:
- Play starts the animation. Particles emit from the selected source and travel through the model.
- Pause freezes the animation in place so you can inspect the current state of the particles.
- Stop ends the animation and clears all particles from the 3D view.

Source selection
Use the Source dropdown to choose which source emits particles. If your simulation has multiple sources, you can switch between them to see how sound propagates from each position.
Octave band selection
A row of frequency band pills (63 Hz to 8 kHz) lets you select which octave band to visualize. The particles will reflect and attenuate based on the surface absorption at the selected frequency.
Color mode
The particle colors can represent two different properties, selectable in the settings panel:
- Reflection colors particles based on reflection count. A color scale from 0 to 10+ reflections is shown, ranging from red (few reflections) through yellow and blue to dark blue (many reflections).
- Absorption colors particles based on the cumulative absorption encountered. The scale ranges from 0 dB to -60 dB.
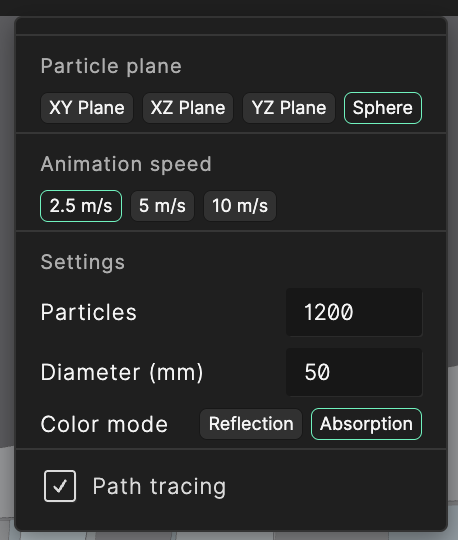
Settings
Click the settings button (chevron icon) on the right side of the particle animation controls to open the settings panel with the following options:
- Particle plane determines the initial emission pattern of the particles. Options are:
- XY Plane — particles emit in the horizontal XY plane
- XZ Plane — particles emit in the vertical XZ plane
- YZ Plane — particles emit in the vertical YZ plane
- Sphere — particles emit in all directions (omnidirectional)
- Animation speed controls how fast the particles travel through the model. Choose between 2.5, 5, or 10 m/s.
- Particles sets the number of particles emitted per cycle (50 to 2,000).
- Diameter (mm) sets the visual size of each particle (2 to 200 mm).
- Color mode toggles between Reflection and Absorption coloring as described above.
- Path tracing when enabled, draws a line along each particle's path so you can trace the full trajectory including all reflections.
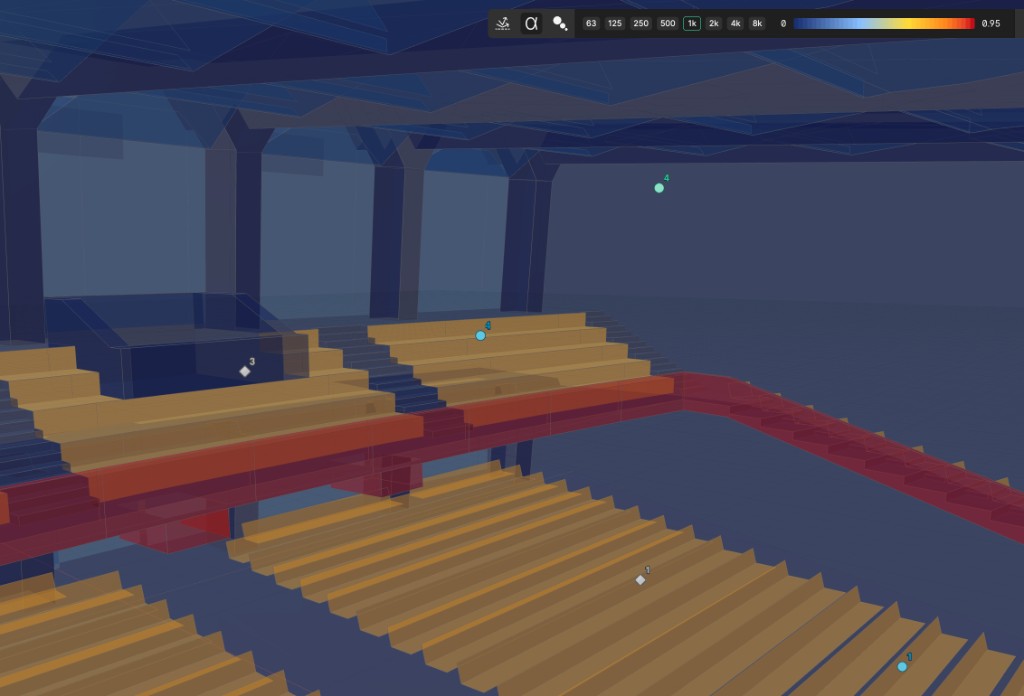
Reflection density
Reflection density visualizes the specular reflection paths between a source and the selected surfaces in your model, making it easy to trace the specular paths that connect a source to different areas of the room. This is particularly useful for designing and positioning reflector arrays to direct sound toward specific listener areas, verifying that key surfaces are contributing the intended reflections, and identifying unwanted specular paths that could cause acoustic issues.
To activate reflection density, click the reflection density icon in the toolbar.

Source selection
Use the Source dropdown to select which source to analyze. The visualization updates to show the specular reflection paths originating from that source and how they interact with the model surfaces.
Surface selection
Use the Surface dropdown to focus on specific surfaces. You can also select a surface in the Materials tab. Multi-select surfaces by holding Ctrl (Windows) or Cmd (Mac) while clicking. Selecting a parent layer selects all of its child surfaces. This lets you isolate individual reflectors or surface groups to see exactly which specular paths involve them.
Reflection order
The Order pills (0, 1, 2, 3) let you filter the visualization by reflection order. Multiple orders can be selected simultaneously:
- 0 — Direct sound (no reflections)
- 1 — First-order reflections
- 2 — Second-order reflections
- 3 — Third-order reflections
Toggle individual orders on and off to isolate specific reflection paths. For example, selecting only order 1 shows where direct specular reflections from the source hit, which is helpful when positioning a reflector array to cover a target seating area.
Hide rays
The Hide rays toggle removes the ray paths from the visualization, showing only the surface hit points. This can help when you are focused on which surfaces are being reached rather than the paths taken.
Absorption coloring
Absorption coloring renders each surface in the model using a color that represents its absorption coefficient at a selected frequency band. This provides a quick visual overview of how absorptive or reflective each surface is, making it easier to spot areas where material changes could improve the acoustic design.
To activate absorption coloring, click the absorption icon in the toolbar.
Octave band selection
A row of frequency band pills (63 Hz to 8 kHz) lets you choose which octave band to display. Since absorption coefficients vary with frequency, switching between bands reveals how the acoustic treatment performs across the spectrum.
Color scale
A color scale is displayed in the toolbar, ranging from 0 (low absorption / highly reflective) to 0.95 (high absorption). The color gradient transitions from:
- Dark blue — low absorption (0)
- Light blue — moderate-low absorption
- Yellow — moderate absorption
- Orange — moderate-high absorption
- Red / dark red — high absorption (0.95)
Selected surface tooltip
When you select a surface in the 3D view while absorption coloring is active, a tooltip appears on the color scale indicating the exact absorption coefficient of that surface at the currently selected octave band. This allows you to read precise values directly from the 3D view without needing to open the material library.
