Room creation
The Treble SDK comes with a selection of geometry generation functions which may be used to programmatically generate simple rooms with code. These functions may be used to define custom shoebox, angled shoebox, L-shaped, T-shaped, U-shaped, and polygon rooms with a simple input in two dimensions.
In all cases, the footprint of the room is defined in two dimensions, along with an offset amount by which the shape is extruded into three dimensions.
You can also easily import your local room geometry and use it for simulations.
This page will cover the following topics:
- importing room geometries
- creating room geometries with different shapes
- randomizing room creation
Basic examples
Create a shoebox room
The simplest geometry handled by this module is a 6-sided shoebox room. The corresponding method is create_shoebox_room.
The following code example creates a shoebox room with joined wall layers:
# Create a narrow and tall shoebox room
room = treble.GeometryDefinitionGenerator.create_shoebox_room(
    width_x=2.3,
    depth_y=1.2,
    height_z=2.5,
    join_wall_layers=True,
)

# visually confirm that there are three separate layers to the model
room.plot()
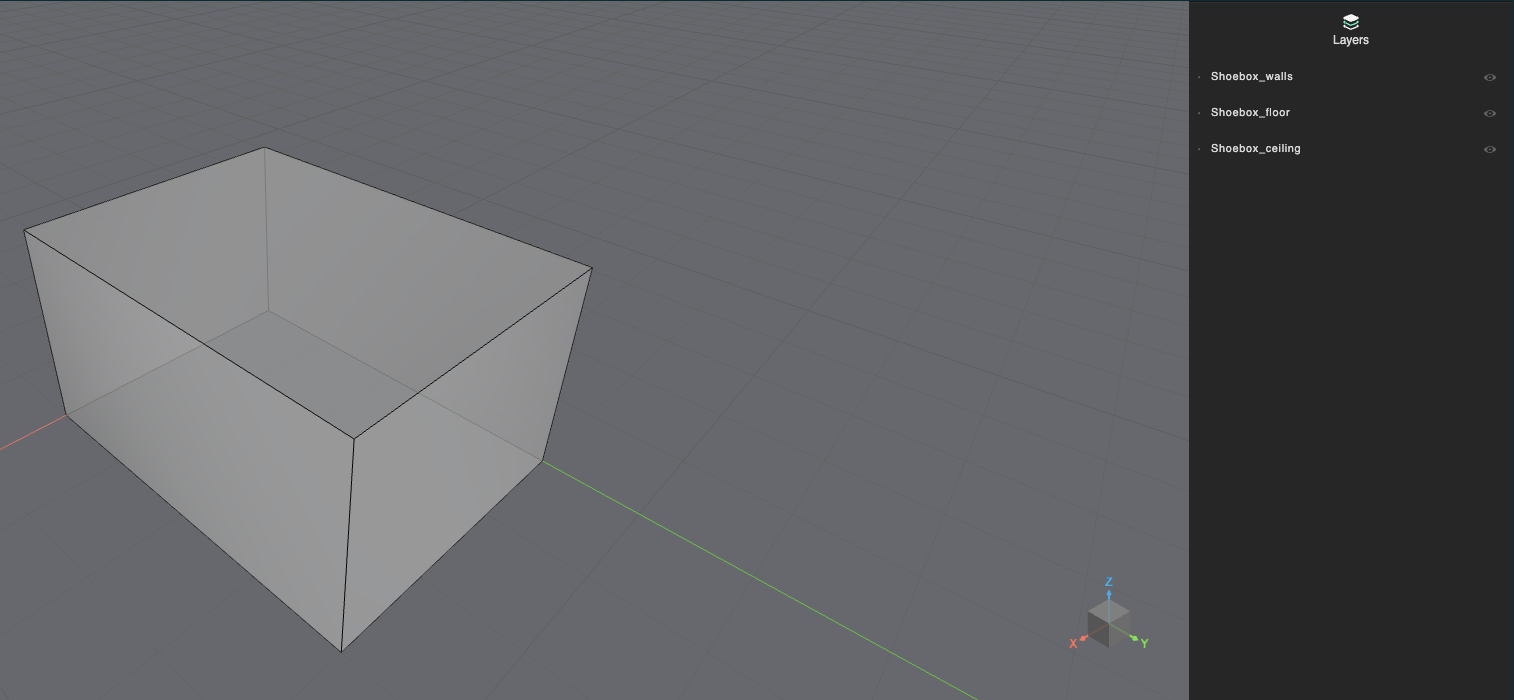
The join_wall_layers boolean determines if each wall within the shoebox will be assigned the same material, or if each wall should be assigned a material individually.
The simplest model possible with this method is when join_wall_layers is True.
When you plot the room model, the individual layers and their associated layer names are displayed as a list on the right-hand-side of the display. This confirms that only three unique layers are associated with this model object: the floor, the ceiling, and the walls.
In contrast, the following code snippet generates an identical shoebox room with separated layers, with a total of six unique layers:
# Create a narrow and tall shoebox room
room = treble.GeometryDefinitionGenerator.create_shoebox_room(
    width_x=2.3,
    depth_y=1.2,
    height_z=2.5,
    join_wall_layers=False,
)
# visually confirm that there are six separate layers to the model
room.plot()
Add the room model to the project
A room is a model. Once you have created the room model using the GeometryDefinitionGenerator, you may add the model to the project for use in simulations using the project.add_model method. This is also explained in your first simulation guide.
from treble_tsdk import display_data as dd
from treble_tsdk import treble
tsdk = treble.TSDK()

# get or create project
project = tsdk.get_or_create_project("Project to demonstrate rooms")

# create the room
room = treble.GeometryDefinitionGenerator.create_shoebox_room(
    width_x=2.3,
    depth_y=1.2,
    height_z=2.5,
    join_wall_layers=False,
)
# add the project and define the name
project.add_model(model_name='test shoebox 1',model_file_path=room)
models = project.get_models()
dd.display(models)
Running project.add_model() with a name that already exists in the project will prompt you to choose a different name.
Good practice is to check for model existence before adding it to the project.
You can also omit model_name and model_file_path.
# If "example room" does not exist, we can add our room to the project with this name
model = project.get_model_by_name("example room")
if model is None:
    model = project.add_model("example room", room)
Create random shoebox rooms
Create multiple random shoebox rooms with create_random_shoebox_rooms.
The dimensions are randomly drawn from the specified range using uniform probability. The returned objects must then be added as models to the project.
The following code example creates 20 random shoebox rooms:
# Create a list of random shoebox rooms
rooms = treble.GeometryDefinitionGenerator.create_random_shoebox_rooms(
    n_rooms=20,
    x_range=[5,15],
    y_range=[6,12],
    z_range=[2,4],
    join_wall_layers=False)

rooms[0].plot()
Import a local room geometry into the project
The treble SDK currently supports room geometry import in three file formats .3dm, .obj, and .dxf.
You can import rooms in these formats into the Treble SDK to be used for your simulations.
The simplest way of doing so is by specifying the model name and the path to your local drive where the file is located, for example:
model_name = "my-room-model"
imported_model = project.add_model(
    model_name=model_name,
    model_file_path="path/to/your/file.3dm"
    )
Wait for meshing
When you upload the room, it is sent to Treble's geometry checking service and meshed. Meshing is required to run the wave-based algorithms on a room, and some downstream methods only work after the mesh has been generated. In these cases, it can be advantageous to wait before proceeding until the room is fully uploaded.
There are two methods related to the model processing time:
imported_model.as_live_model_status() writes the current status for the model upload into the output cell. imported_model.wait_for_model_processing() delays the cell's runtime until the mesh has been fully processed.
This ensures that all downstream methods work correctly.
imported_model.wait_for_model_processing()
imported_model.plot()
Wait for meshing and check for model name existence
The Treble SDK requires unique model names. The following example demonstrates how to check if the model name has already been used before uploading the model.
model_name = "my-room-model"
imported_model = project.get_model_by_name(model_name)

if not imported_model:
    print("Room model not found. Uploading model.")
    imported_model = project.add_model(
        model_name=model_name,
        model_file_path="path/to/your/file.3dm"
        )
    imported_model.as_live_model_status()

imported_model.wait_for_model_processing()
if imported_model.status == "Valid":
    imported_model.plot()
Import a room without meshing it
If a room will only be used for GA simulations, you can import the model and bypass the meshing step. This will save time while uploading the model to the SDK.
    imported_model = project.add_model(
    model_name=model_name,
    model_file_path="path/to/your/file.3dm",
    geometry_checker_settings=treble.GeometryCheckerSettings(ga_only=True),
    )
Advanced examples
Create angled shoebox room
create_angled_shoebox_room
The simplest geometry handled by this module is a 6-sided shoebox room with angled walls, which may be either a parallelogram or a trapezoid, depending on the provided parameters.
The properties of this function are illustrated below:
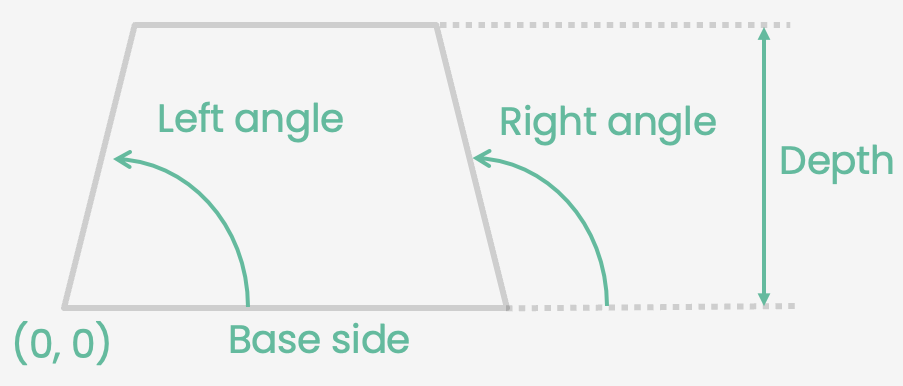
The function always assumes two walls, both parallel to the x-axis.
It will automatically generate side walls at the specified angles to connect the parallel walls, and will scale the wall at y=depth_y to be the appropriate length.
This function will not generate a valid room if right_angle and left_angle are defined such that the sum of all angles exceeds 360°. Likewise, if depth_yis defined such that the two side walls will converge a y < depth_y, the function will not generate a valid room.
The following code example creates a trapezoidal shoebox room with joined wall layers:
# Create an angled shoebox room (trapezoid)
room = treble.GeometryDefinitionGenerator.create_angled_shoebox_room(
    base_side=5,
    depth_y=3,
    left_angle=45,
    right_angle=100,
    height_z=2.2,
    join_wall_layers=True
)

room.plot()
Create random angled shoebox rooms
create_random_angled_shoebox_rooms
Create multiple random angled-shoebox rooms. The dimensions are randomly drawn from the specified ranges.
The following code example creates 20 random angled-shoebox rooms:
# Create random angled shoebox rooms
rooms = treble.GeometryDefinitionGenerator.create_random_angled_shoebox_rooms(
    n_rooms=20,
    base_side_range=[3,8],
    depth_range=[2,7],
    left_angle_range=[15,90],
    right_angle_range=[15,160],
    height_range=[2,4],
    join_wall_layers=False)

rooms[0].plot()
Create L-shaped room
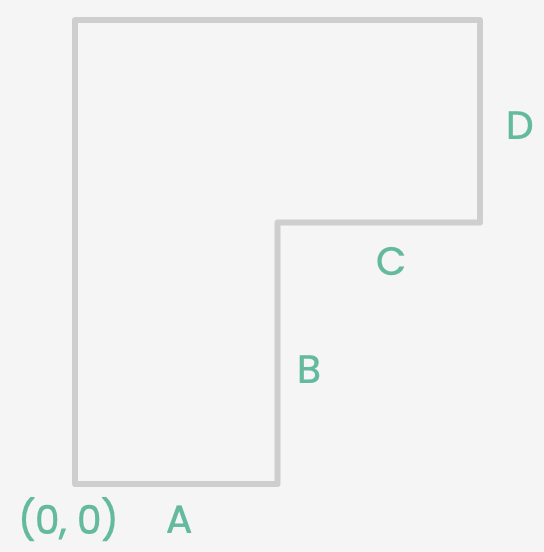
The L-shaped room creates a room with 8 total surfaces, where the arms of the L-shape are determined by four unique values. The four values specify the lengths of the line segments defining the concave edges of the L-shape, as illustrated in the following image.
The following code example creates an L-shaped room with joined wall layers:
# Create an L-shaped room
room = treble.GeometryDefinitionGenerator.create_L_shaped_room(
    a_side=1,
    b_side=2,
    c_side=3,
    d_side=2,
    height_z=2.2,
    join_wall_layers=True
)

room.plot()
Create random L-shaped rooms
create_random_L_shaped_rooms
Create multiple random L-shaped rooms. The dimensions are randomly drawn from the specified ranges.
The following code example creates 20 random L-shaped rooms:
# Create random L-shaped rooms
rooms = treble.GeometryDefinitionGenerator.create_random_L_shaped_rooms(
    n_rooms=20,
    a_side_range=[1,5],
    b_side_range=[2,8],
    c_side_range=[7,9],
    d_side_range=[1,10],
    height_range=[2,4],
    join_wall_layers=False)

rooms[0].plot()
Create T-shaped room
create_T_shaped_room
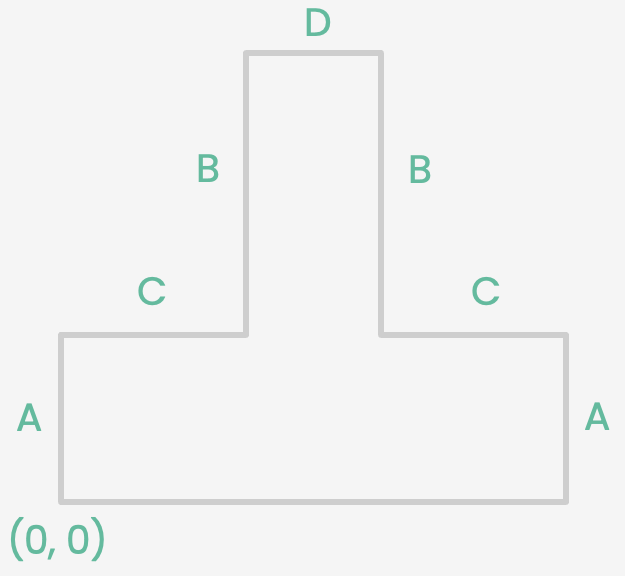
The T-shaped room creates a room with 10 total surfaces, where the arms of the T-shape are determined by four unique values. The four values specify the lengths of certain line segments along the edges of the T-shape, as illustrated in the following image.
The following code example creates a T-shaped room with separated wall layers:
# Create a T-shaped room
room = treble.GeometryDefinitionGenerator.create_T_shaped_room(
    a_side= 1,
    b_side= 3,
    c_side= 1,
    d_side= 2,
    height_z= 2.2,
    join_wall_layers= False
)

room.plot()
Create random T-shaped rooms
create_random_T_shaped_rooms
Create multiple random T-shaped rooms. The dimensions are randomly drawn from the specified ranges.
The following code example creates 20 random T-shaped rooms:
rooms = treble.GeometryDefinitionGenerator.create_random_T_shaped_rooms(
    n_rooms=20,
    a_side_range=[1,5],
    b_side_range=[2,8],
    c_side_range=[7,9],
    d_side_range=[1,10],
    height_range=[2,4],
    join_wall_layers=False)

rooms[5].plot()
Create U-shaped room
create_U_shaped_room
The U-shaped room creates a room with 10 total surfaces, where the dimensions of the U-shape are determined by four unique values. The four values specify the lengths of certain line segments along the edges of the U-shape, as illustrated in the following image.
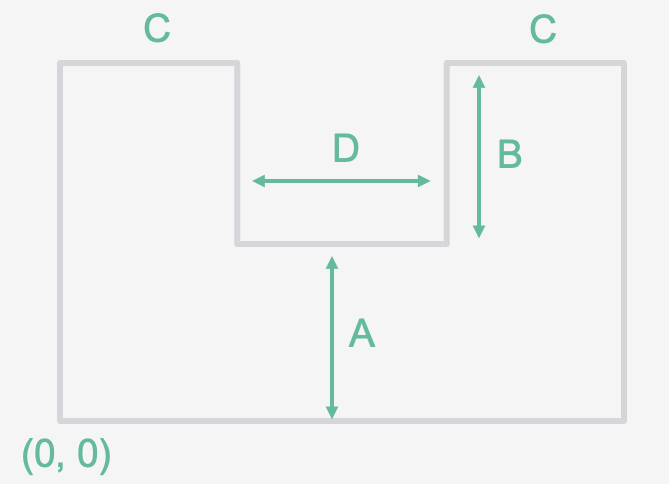
The following code example creates a U-shaped room with separated wall layers:
# Create a U-shaped room
room = treble.GeometryDefinitionGenerator.create_U_shaped_room(
    a_side= 1,
    b_side= 3,
    c_side= 1,
    d_side= 2,
    height_z= 2.2,
    join_wall_layers= False
)

room.plot()
Create random U-shaped rooms
create_random_U_shaped_rooms
Create multiple random U-shaped rooms. The dimensions are randomly drawn from the specified ranges.
The following code example creates 20 random U-shaped rooms:
rooms = treble.GeometryDefinitionGenerator.create_random_U_shaped_rooms(
    n_rooms=20,
    a_side_range=[1,5],
    b_side_range=[2,8],
    c_side_range=[7,9],
    d_side_range=[1,10],
    height_range=[2,4],
    join_wall_layers=False)

rooms[0].plot()
Create polygon room
create_polygon_room
The final method of the Geometry Generator uses a list of points defined in x- and y- dimensions to create the footprint of a room.
The list of points should contain a series of 2D points, represented as a pair of coordinates [x,y].
These points define the vertices of the polygon shape.
This function constructs the wall by connecting the points sequentially: while you may reverse the entire order of the list and still yield a valid input, arbitrary reordering of individual points within the list may break the continuity of the closed perimeter, resulting in a non-water-tight model.
Always ensure that the consecutive points in the list form the continuous edge of the desired shape. Verify the points visually if possible, or confirm that they form a closed loop!
The following code example creates two valid rooms (1,2) and one invalid room (3).
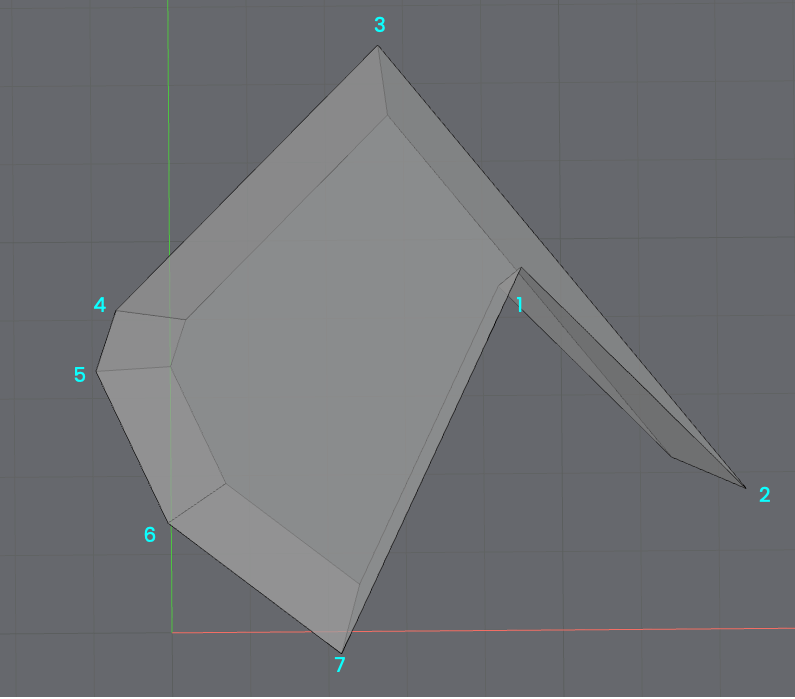 1
1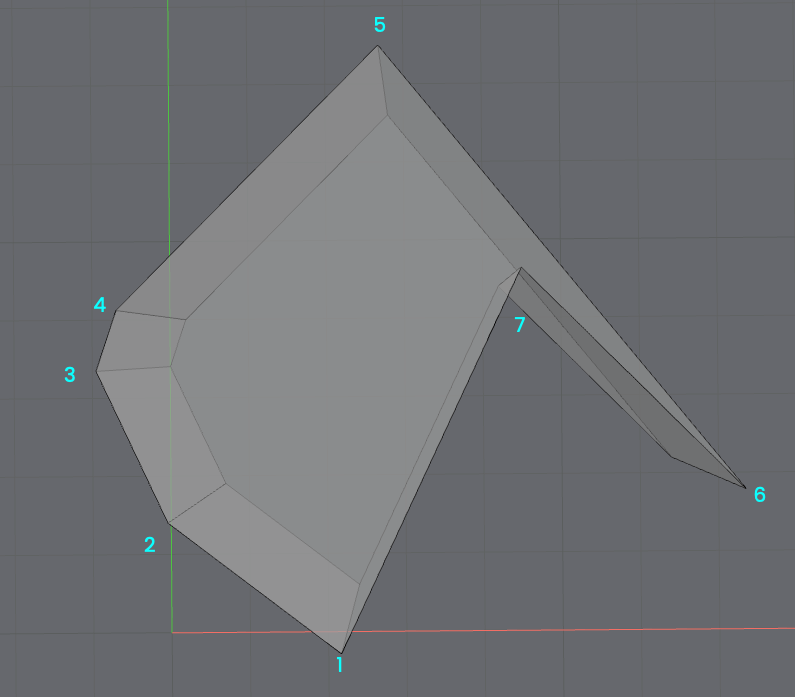 2
2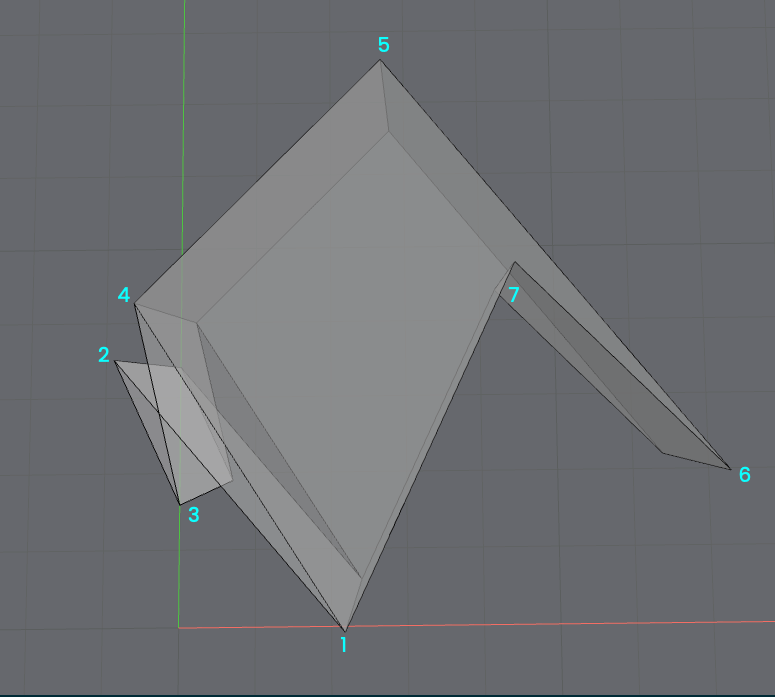 3
3# define the hexagon points in a counter-clockwise direction
edge_points_hexagon= [[4.2, 4.4],[6.4, 2.2],[2.8, 6.6],[0.2, 4],[0, 3.4],[0.7, 1.9],[2.4, 0.6]]
room1 = treble.GeometryDefinitionGenerator.create_polygon_room(
points_xy=edge_points_hexagon,
height_z=2.2,
join_wall_layers=False
)
room1.plot() # see figure 1
# flip the order of the original edge_points_hexagon list
flipped_edge_points_hexagon = edge_points_hexagon[::-1]
room2 = treble.GeometryDefinitionGenerator.create_polygon_room(
    points_xy=flipped_edge_points_hexagon,
    height_z=2.2,
    join_wall_layers=False
)
room2.plot() # see figure 2
print(flipped_edge_points_hexagon) # confirm that the order is flipped
Switch the order of the elements at index 1 and index 2 of the flipped vector, then plot the resulting room:
# switch the elements
old_index_1 = flipped_edge_points_hexagon[1]
old_index_2 = flipped_edge_points_hexagon[2]
flipped_edge_points_hexagon[1] = old_index_2
flipped_edge_points_hexagon[2] = old_index_1

room3 = treble.GeometryDefinitionGenerator.create_polygon_room(
    points_xy=flipped_edge_points_hexagon,
    height_z=2.2,
    join_wall_layers=False,
)
room3.plot() # see figure 3
print(flipped_edge_points_hexagon)
The room in figure 3 still generates with the invalid point order, but returns a MesherError later, during the starting simulations step.